Introduction
Point clouds are critical for many computer vision applications, such as autonomous driving, robotics, and 3D reconstruction. In this blog, we explore how to generate a 3D point cloud from a 2D depth image using Open3D and the KITTI dataset. We will break down the steps, starting from downloading the data, reading the depth images, and converting them into a 3D point cloud, which can then be visualized and simulated using Open3D.
The code provided here serves as a base for understanding how to handle LiDAR point cloud data for simulations, bringing 2D sensor information into a 3D space. This approach is vital for applications like self-driving cars, where understanding the environment in 3D is crucial.
What is the KITTI Dataset?
The KITTI dataset is one of the most widely used datasets for training and evaluating algorithms for autonomous driving. It contains sequences of images, depth maps, and point clouds, along with vehicle data collected from real-world driving environments. Here, we’ll use a depth image from the LiDAR sensor of the KITTI dataset to simulate 3D point clouds.
Steps Overview
- Download and Load the Data
- Read and Scale the Depth Image
- Convert Depth Image to Point Cloud
- Simulate and Visualize the Point Cloud
1. Download and Load the Dataset
We start by downloading the 2D KITTI Depth Frames dataset. Using a Python function, we can automatically fetch the dataset file from a given URL and save it locally.
# Function to download dataset
def download_dataset(url, local_filename):
    if "www.dropbox.com" in url and "?dl=0" in url:
        url = url.replace("?dl=0", "?dl=1")

    response = requests.get(url)

    if response.status_code == 200:
        with open(local_filename, 'wb') as f:
            f.write(response.content)
        print(f"File downloaded and saved as {local_filename}")
    else:
        print(f"Failed to download file. Status code: {response.status_code}")

# Download 2D KITTI Depth Frames Dataset
download_dataset('https://www.dropbox.com/scl/fi/wfg0ta7kx57be15hw40wl/archive.zip?rlkey=fei6eqeucmbcbkw478dfsy7qg&dl=1', 'archive.zip')
After downloading, you would extract and load the necessary depth images.
2. Read and Scale the Depth Image
Once the dataset is available, the depth images need to be read and processed. Each depth image provides 2D data representing the distance of objects from the LiDAR sensor. We scale the depth image to reflect real-world distances using a depth_image_scaling_factor.
# Read the 2D Depth Image
def load_depth_image(file_path):
    depth_image = plt.imread(file_path)
    depth_image_scaling_factor = 250.0
    depth_image *= depth_image_scaling_factor
    return depth_image
The depth values are now in real-world units, ready to be transformed into a point cloud.
3. Convert Depth Image to Point Cloud
We convert the 2D depth image into a 3D point cloud by computing the x, y, and z coordinates for each pixel in the depth image. This process involves using horizontal and vertical angles (based on the sensor’s field of view) and applying trigonometric functions to calculate the 3D positions.
def depth_image_to_point_cloud(depth_image, h_fov=(-90, 90), v_fov=(-24.9, 2.0), d_range=(0,100)):
    h_angles = np.deg2rad(np.linspace(h_fov[0], h_fov[1], depth_image.shape[1]))
    v_angles = np.deg2rad(np.linspace(v_fov[0], v_fov[1], depth_image.shape[0]))

    h_angles = h_angles[np.newaxis, :]
    v_angles = v_angles[:, np.newaxis]

    x = depth_image * np.sin(h_angles) * np.cos(v_angles)
    y = depth_image * np.cos(h_angles) * np.cos(v_angles)
    z = depth_image * np.sin(v_angles)

    valid_indices = (depth_image >= d_range[0]) & (depth_image <= d_range[1])

    x = x[valid_indices]
    y = y[valid_indices]
    z = z[valid_indices]

    point_cloud = np.stack((x, y, z), axis=-1)

    return point_cloud
This function computes the 3D coordinates based on the depth values and sensor geometry. It also filters out points that fall outside the specified distance range.
4. Simulate and Visualize the Point Cloud
Finally, we simulate the point cloud using Open3D’s visualization tools. Each depth frame is processed to create a 3D scene, and the frames are visualized one after another to simulate movement through the environment.
def animate_point_clouds(point_clouds):
    vis = o3d.visualization.Visualizer()
    vis.create_window()

    vis.get_render_option().background_color = np.array([0, 0, 0])

    point_cloud = o3d.geometry.PointCloud()
    point_cloud.points = o3d.utility.Vector3dVector(point_clouds[0])
    vis.add_geometry(point_cloud)

    frame_index = 0
    last_update_time = time.time()
    update_interval = 0.25

    while True:
        current_time = time.time()
        if current_time - last_update_time > update_interval:
            point_cloud.points = o3d.utility.Vector3dVector(point_clouds[frame_index])
            vis.update_geometry(point_cloud)

            frame_index = (frame_index + 1) % len(point_clouds)
            last_update_time = current_time

        vis.poll_events()
        vis.update_renderer()

        if not vis.poll_events():
            break

    vis.destroy_window()
In this simulation, Open3D updates the 3D point cloud at regular intervals, creating an animated visualization.
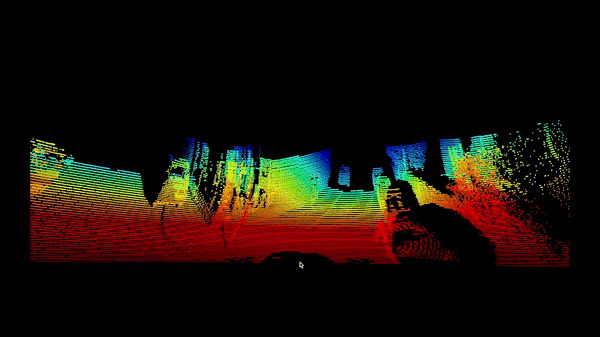
Example Output
The following image shows a sample point cloud simulated from the 2D depth data of the KITTI dataset:

Conclusion
Using Open3D, we can transform 2D depth images into meaningful 3D point clouds. This blog illustrated how to download the KITTI dataset, process the depth data, and simulate a 3D environment. These techniques are invaluable for real-world applications like autonomous vehicles, where understanding the surrounding environment is critical for decision-making.
If you’re interested in working with 3D data or building simulations, Open3D is a powerful tool that simplifies these tasks, allowing for rapid development and experimentation.