This is part 2 of 2 in which we’ll cover how to run a Laravel application in production mode with Docker. Feel free to catch up on Part 1 before diving into this.
The goal of this second post is to highlight the differences in workflow between the development environment that we use to build our apps and the production environment in which our apps actually run.
What’s different in production?
This post will only cover a single-server setup. We’ll do it all the manual way so you can see all the bits and pieces that are needed.
Source files:
In development, we usually mount the current working directory into a container so that changes can be made to the source code and will be immediately reflected in the running application. In production however, we’ll copy our source files directly into images so that they can be run independent of the host (ie: on a server somewhere).
Exposed ports:
In development, we’ll sometimes bind ports on the host to containers to enable easier debugging. This is not required in production as services can communicate through the network docker-compose creates automatically for us.
Data persistence:
In development we setup MySql with a named volume to allow the data are written to it to persist (even when our containers stop and restart) — but we didn’t handle situations where the app may want to write to disk (in the case of Laravel, this happens with views) — so, in production, we’ll need to create a volume which will allow the data that’s written to disk to persist.
Environment Variables
In development we just had a .env file that was available to the container along with all the rest of our source code. In production we’ll load a different one in dynamically
SSL & Nginx config
We’ll need to configure our web server to enable secure connections, but we’ll want to load the path to the certs dynamically at run time so that we can swap live ones for self-signed when testing the production setup locally.
Step 1 — Prepare the ‘app’ image
In the first post we created a PHP-FPM based image that was suitable for running a Laravel application. Then all we needed to do was mount our current directory into that container and the app worked. For production we need to think about it differently though, the steps are:
- Use a Laravel-ready PHP image as a base
- Copy our source files into the image (not including the vendor directory)
- Download & Install composer
- Use composer within the image to install our dependencies
- Change the owner of certain directories that the application needs to write to
- Run PHP artisan optimize to create the class map needed by the framework.
So let’s dive in. First up you’ll want to create the app.dockerfile that we’ll use to accomplish all of this.
FROM shakyshane/laravel-php:latest

COPY composer.lock composer.json /var/www/

COPY database /var/www/database

WORKDIR /var/www

RUN php -r "copy('https://getcomposer.org/installer', 'composer-setup.php');" \
    && php -r "if (hash_file('SHA384', 'composer-setup.php') === '55d6ead61b29c7bdee5cccfb50076874187bd9f21f65d8991d46ec5cc90518f447387fb9f76ebae1fbbacf329e583e30') { echo 'Installer verified'; } else { echo 'Installer corrupt'; unlink('composer-setup.php'); } echo PHP_EOL;" \
    && php composer-setup.php \
    && php -r "unlink('composer-setup.php');" \
    && php composer.phar install --no-dev --no-scripts \
    && rm composer.phar

COPY . /var/www

RUN chown -R www-data:www-data \
        /var/www/storage \
        /var/www/bootstrap/cache

RUN php artisan optimize
Notes:
- On line 1 we’rebuilding from an image I’ve published to the Docker hub that contains just enough to run a Laravel Application.
- Because on line 3 & 5 we use the COPY command, Docker will check the contents of the what’s copied each time we attempt a build. If nothing has changed, it can use a cached version of that layer — but if something does change, even a single byte in any file, the entire cache is discarded and all following commands will execute again. In our case that means every time we attempt to build this image, if our decencies have not changed (because the compose.lock file is identical) then Docker will not execute the
RUNcommand that containscomposer installand our builds will be nice and fast!
Step 2 — create .dockerignore
In the previous snippet we saw the line COPY . /var/www This alone would include every single file (including hidden directories like .git) resulting in a HUGE image. To combat this we can include a .dockerignore file in the project root.
It works just like the .gitignore you’re used to, and should include the following as a minimum.
.git
.idea
.env
node_modules
vendor
storage/framework/cache/**
storage/framework/sessions/**
storage/framework/views/**
Notes:
- The last three lines are there to ensure any files written to disk by Laravel in development are not included, but we do need the directory structures to remain.
Step 3 — Build the ‘app’ image
With the files app.dockerfile and .dockerignore created, we can go ahead and build our custom image.
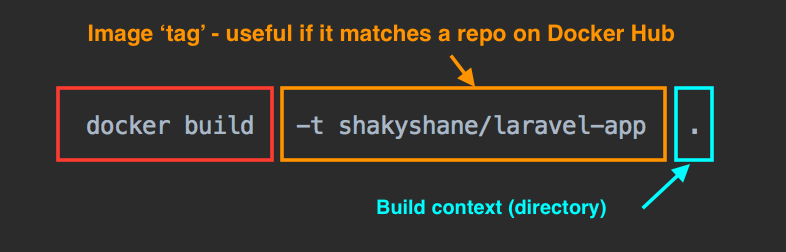
docker build -t shakyshane/laravel-app .
Notes:
- This may take a few minutes whilst the dependencies are downloaded by composer.
-there instructs Docker to ‘tag’ this image. You can use whatever naming convention you like, but you need to consider where this image is going to end up when deciding. In this example I’m publishing this image under my username on docker hub (shakyshane) and want the repo to be namedlaravel-appYou can see what I mean here https://hub.docker.com/r/shakyshane/laravel-app/ & for the more visual amongst us:
When the image has built successfully, you can run docker images to verify the image is tagged correctly.
Step 4— Add the ‘app’ service to docker-compose.prod.yml
Now we can begin to build up the file docker-compose.prod.yml starting with our app service. (as in the first post, these are all under the ‘services’ key, but don’t worry as there will be full snippets later).
#  The Application
app:
  image: shakyshane/laravel-app
  volumes:
    - /var/www/storage
  env_file: '.env.prod'
  environment:
    - "DB_HOST=database"
    - "REDIS_HOST=cache"
Notes:
- We use
image: shakyshane/laravel-apphere to point to the image we just built in the last step. Remember this has all of our source code inside it, so we do not need to mount any directories from our host. - We need a way for files written to disk by the application to persist in the environment in which it runs. Using a volume definition in this manner
/var/www/storagewill cause Docker to create a persistent volume on the host that will survive any container stop/starts. - We’re going to set up Redis as the session and cache driver, but I’ve yet to find a way to stop Laravel writing view caching to disk, that’s why this single volume is required.
- We use
env_file: ‘.env.prod’to mount a Laravel environment file into the container. This part is something that can be improved by using a dedicated secret-handling solution, but I’m not dev-opsy enough to do that, and in cases where we’re just using a single-server setup, I think this approach is ok. (please, any security experts out there, correct/point me in the right direction)
Step 5 — Prepare the ‘web’ image
So, now that we’re building a custom image that contains a PHP environment, all of our source code and all application dependencies, it’s time to do the same for the web server.
This one is much simpler. We’re just going to build Nginx, copy a vhost.confinto place (suitable for a Laravel app), and then copy in the entire publicdirectory. This will allow nginx to serve our static files that do not require processing by the application (such as images, css, js etc)
So go ahead now and create web.dockerfile . It only needs the following:
FROM nginx:1.10-alpine

ADD vhost.conf /etc/nginx/conf.d/default.conf

COPY public /var/www/public
Notes:
- This time we’re using
nginx:1.10-alpine— the-alpinebit on the end means this base image was built from a teeny tiny linux base image that will shave 100s of MB from our final image size. - The alpine build also supports HTTP2 out of the box also, so, bonus.
Step 6 — Create the NGINX config
Save the following as vhost.conf — that’s the name we had above in web.dockerfile
server {
    server_name localhost;
    listen 443 ssl http2 default_server;
    listen [::]:443 ssl http2 default_server;

    ssl_certificate /etc/letsencrypt/live/example.com/fullchain.pem;
    ssl_certificate_key /etc/letsencrypt/live/example.com/privkey.pem;
    ssl_protocols TLSv1 TLSv1.1 TLSv1.2;
    ssl_prefer_server_ciphers on;
    ssl_ciphers 'ECDHE-RSA-AES128-GCM-SHA256:ECDHE-ECDSA-AES128-GCM-SHA256:ECDHE-RSA-AES256-GCM-SHA384:ECDHE-ECDSA-AES256-GCM-SHA384:DHE-RSA-AES128-GCM-SHA256:DHE-DSS-AES128-GCM-SHA256:kEDH+AESGCM:ECDHE-RSA-AES128-SHA256:ECDHE-ECDSA-AES128-SHA256:ECDHE-RSA-AES128-SHA:ECDHE-ECDSA-AES128-SHA:ECDHE-RSA-AES256-SHA384:ECDHE-ECDSA-AES256-SHA384:ECDHE-RSA-AES256-SHA:ECDHE-ECDSA-AES256-SHA:DHE-RSA-AES128-SHA256:DHE-RSA-AES128-SHA:DHE-DSS-AES128-SHA256:DHE-RSA-AES256-SHA256:DHE-DSS-AES256-SHA:DHE-RSA-AES256-SHA:AES128-GCM-SHA256:AES256-GCM-SHA384:AES128-SHA256:AES256-SHA256:AES128-SHA:AES256-SHA:AES:CAMELLIA:DES-CBC3-SHA:!aNULL:!eNULL:!EXPORT:!DES:!RC4:!MD5:!PSK:!aECDH:!EDH-DSS-DES-CBC3-SHA:!EDH-RSA-DES-CBC3-SHA:!KRB5-DES-CBC3-SHA';
    ssl_session_timeout 1d;
    ssl_session_cache shared:SSL:50m;
    add_header Strict-Transport-Security max-age=15768000;

    index index.php index.html;
    root /var/www/public;

    location / {
        try_files $uri /index.php?$args;
    }

    location ~ \.php$ {
        fastcgi_split_path_info ^(.+\.php)(/.+)$;
        fastcgi_pass app:9000;
        fastcgi_index index.php;
        include fastcgi_params;
        fastcgi_param SCRIPT_FILENAME $document_root$fastcgi_script_name;
        fastcgi_param PATH_INFO $fastcgi_path_info;
    }
}

server {
   listen         80;
   listen    [::]:80;
   return         301 https://$host$request_uri;
}
Notes:
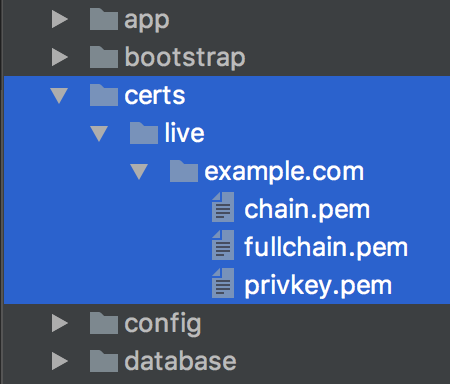
- Where you see paths like
/etc/letsencrypt/live/example.comin that file above, you can changeexample.comfor your own domain if you have one, but either way, go and download some self-signed certs from http://www.selfsignedcertificate.com/ (or generate your own if you know how) and stick them in the following directorycerts/live/example.com— it should look like this when done.
- The idea is that when testing locally, you can pass in something like
LE_DIR=certs— referring to your local directory, but then on the server you can passLE_DIR=/etc/letsencrypt— which is where the certbot will dump your certs. This will create security warnings locally due the self-signed certificates, but you can click past the warning to fully test HTTP2 + all your links over a HTTPs connection.
Step 7 — Build the ‘web’ image
With the files web.dockerfile and vhost.conf created, we can go ahead and build our second custom image.
docker build -t shakyshane/laravel-web .
Notes:
- Just as the previous image, we tag this one to match the repo name under which it will live later.
Step 8— Add the ‘web’ service to docker-compose.prod.yml
# The Web Server
web:
  image: shakyshane/laravel-web
  volumes:
    - "${LE_DIR}:/etc/letsencrypt"
  ports:
    - 80:80
    - 443:443
Notes:
- We mount the directory containing our certificates using an environment variable. Docker-compose will replace
${LE_DIR}with the value we provide at run time which will allow us to swap between live/local certs. - We bind both port
80&443from host->container. This is so that we can handle both insecure and secure traffic — you can see this in the secondserverblock in thevhost.conffile above.
Step 9 — Add MySql and Redis services to docker-compose.prod.yml
Finally, the configuration for MySql and Redis needs to be placed in our docker-compose.prod.yml file — but for these we do not need to build any custom images.
version: '2'
services:

  # The Database
  database:
    image: mysql:5.6
    volumes:
      - dbdata:/var/lib/mysql
    environment:
      - "MYSQL_DATABASE=homestead"
      - "MYSQL_USER=homestead"
      - "MYSQL_PASSWORD=secret"
      - "MYSQL_ROOT_PASSWORD=secret"

  # redis
  cache:
    image: redis:3.0-alpine

volumes:
  dbdata:
Notes:
- We use a named volume for MySql to ensure data will persist on the host, but for Redis we don’t need to do this as the image is configured to handle this for us.
Step 10 — Create .env.prod
As with any Laravel Application, you’re going to need a file containing your app’s secrets, a file that is usually different for each environment. Now because we want to run this application in ‘production’ mode on our local machine, we can just copy/paste the default Laravel .env.example sample file and rename to .env.prod — then when this application ends up on a server somewhere we can create the correct environment file and use that instead.
Step 11 — Test in production mode, on your machine!
This is where things start to get seriously cool. We’ve built our source & dependencies directly into images in a way that allows them to run on any host that has Docker installed, but the best bit is that this includes your local development machine!. Say goodbye to test locally, pushing and hoping for the best!
At this point we just have a final command to run, but it’s worth recapping what you should’ve done up to this point.
- Created a
app.dockerfile, built an image from it & configured it indocker.compose.prod.yml - ^ same again for
web.dockerfile - Created a .
dockerignorefile for exclude files and directories fromCOPYcommands - Created the
vhost.conffile with NGINX configuration, created self-signed certs for local testing & added thedocker-compose.prod.ymlconfig for it - Added the Redis & MySql configurations
- Created a
env.prodconfiguration file
Your docker-compose.prod.yml should look something like the following:
version: '2'
services:

  #  The Application
  app:
    image: shakyshane/laravel-app
    working_dir: /var/www
    volumes:
      - /var/www/storage
    env_file: '.env'
    environment:
      - "DB_HOST=database"
      - "REDIS_HOST=cache"

  # The Web Server
  web:
    image: shakyshane/laravel-web
    volumes:
      - "${LE_DIR}:/etc/letsencrypt"
    ports:
      - 80:80
      - 443:443

  # The Database
  database:
    image: mysql:5.6
    volumes:
      - dbdata:/var/lib/mysql
    environment:
      - "MYSQL_DATABASE=homestead"
      - "MYSQL_USER=homestead"
      - "MYSQL_PASSWORD=secret"
      - "MYSQL_ROOT_PASSWORD=secret"

  # redis
  cache:
    image: redis:3.0-alpine

volumes:
  dbdata:
Once that’s in place, all that’s left to do is run a single command…
LE_DIR=./certs docker-compose -f docker-compose.prod.yml up
And in a few moments your application will be accessible at https://0.0.0.0
Congratulations, you’re now running your application in a way which is 100% reproducible on a production server — no kidding! Once the 2 images we built are published to a registry like Docker Hub, all you’d need to do is place the docker-compose.prod.yml & an .env file on a server and your application will be running using the exact system you already tested on your local machine.
This is developer bliss.
Next Steps.
I can only cover so much here, and the main focus of this blog was to fill in the pieces I found to be lacking from other posts in terms of the differences between using Docker in Development and then in Production.
As I mentioned at the beginning, this setup has served me well in a single-server environment where I did the following steps to get it running in production:
- Created a Digital Ocean Droplet with Docker pre-installed.
- Followed one of their guides for installing docker-compose (it doesn’t come pre-installed on Linux like it does on Docker for Mac/Windows)
- Setup auto-building in Docker Hub, so that when I push to Github the two images are automatically built.
- Used certbot to generate SSL certs on the server
- Ran the same
docker-composecommand seen above, but this time swapping theLE_DIRpart for the path on the server to the certs. eg:LE_DIR=/etc/letsencrypt docker-compose -f docker-compose.prod.yml up
There’s so much more to Docker however, I’m just showing you the first steps here so you can grasp some concepts about what it means to containerize your application.
Here’s the REPO, you can find all the files in there, have fun!
Next things to look at:
- CI: Lots of the steps in this post can be automated, for example, you may use a CI service to build and publish your images to a registry, along with running tests etc. I would recommend that you get familiar with building/pushing images manually first however, just so that you fully understand the workflow bits and pieces before you move into a completely automated flow.
- Secret & certs management: Having an entire application along with it’s running environment neatly packaged into containers just feels like the correct thing to do, but due to my lack of dev opts/sysadmin skills, I honestly don’t know how to remove these 2 items from being mounted at run time. I hear that Docker is currently working on it’s own solution for secrets management, which will be so cool to have it integrated. Container services such as Kubernetes already provide solutions for it out of the box however, and then there’s also dedicated things such as Vault…. So much to learn… 🙂
- Swarm mode, scaling etc: Docker has native support for scaling applications across multiple host using simple CLI commands. Very much looking forward to using this in the future. I’ve tried using docker-machine to boot up cloud servers on Digital Ocean and I can tell you right now that it’s a mind-blowing experience — especially when you realise that all of your regular docker commands, including things such as docker-compose, all work over the network… Crazy cool.
Reference from medium.com