This is part 1 of 2 in which we’ll cover how to run a Laravel application locallywith Docker. Part 2 will then complete the tutorial by showing how to run the same application in Production.
The goal in this first post is to create a reproducible development environment that is lightweight, fast & does not depend on anything being globally installed on our local machine (other than docker itself).
So, we’re talking about achieving the following goals.
- No Mamp or similar programs
- No Vagrant or similar VM setups
- No Globally installed PHP
- No Globally installed Composer
Step 1 — grab the latest Laravel release
I’m using curl here to grab the latest release from Github, but feel free to obtain a copy of the source however you like — you could just do a git clone — but if you do, don’t forget to wipe the .git directory immediately after.
We’re not following the official guide for setting up Laravel here as we don’t want the hassle of installing PHP/Composer globally on our dev machine
curl -L https://github.com/laravel/laravel/archive/v5.3.16.tar.gz | tar xz
That would create a directory called laravel-5.3.16 — you should rename it to whatever you want your project to be. eg mv laravel-5.3.16 my-site and then cd into it.
Step 2 — Install dependencies
We need to run composer install to pull in all of the libraries that make up Laravel — we can use the composer/composer image from the docker hub to handle this for us.
We’ll create a throw-away container by executing the following command.
docker run --rm -v $(pwd):/app composer/composer installNotes:
- We use the
--rmflag to ensure this container does not linger around following the install. -v $(pwd):/appis used to mount the current directory on the host (your cpu) to/appin the container — this is where composer running inside the container expects to find acomposer.json-v $(pwd):/appwill also ensure that the vendor folder created by composer inside the container is also visible on our machine.
Step 3 — create the development docker-compose.yml file
We’ll be using 2 separate files to define how our environments should run. 1 for development, and another for production. Now, Docker-compose doesactually support using multiple input files, allowing you to override specific keys — but because of the way it merges arrays, it will not be suitable for our particular use case. We’ll just have to put up with a bit of duplication in both files.
Anyway, you’ll need to create the following file:
docker-compose.yml
It should begin with…
version: '2'
services:
   ... our services will go here
… into which we can begin to add our services.
PHP-FPM
This will handle executing the code within the application. We’ll also use this service to execute arbitrary php scripts — such as running artisan the CLI tool that ships with Laravel. (remember this block is under the ‘services’ key from above — don’t worry, there’ll be full snippets later)
Notes:
- We’re going to use a separate
app.dockerfile(line 4) to build our image as we want to control exactly what modules PHP is using. - We set the working directory to
/var/www— that’s where the app code will be inside the container, so it’ll save us having to CD into that folder should we ever attach to the container. It will also makeexeccommands shorter (we’ll see an example of this shortly) - We use a single volume definition
./:/var/wwwto mount the everything in the current directory on the host into/var/wwwin the container. This will allow us to make changes to our source code and have them reflected in the running application immediately. This is going to make your app feel sluggish in the browser — a few hundred ms lag (especially on OSX), but fear not — in part 2 when we transition to a production setup the speed issues will no longer be there.

- The environment variables
DB_PORT&DB_HOSTare set here to match up with the database container we’ll create shortly
Now we need to create the app.dockerfile that we referenced in the buildsetting above.
app.dockerfileNotes:
php:7.0.4-fpmis used here, but could be anything of your choosing.- The rest is the just basics needed for a typical Laravel CRUD app, with imagick thrown in for good measure (I have a few photo apps :))
NGINX
Next, we need a web-server configured to handle both the serving of static files, and pass-through of requests that need to be handled by the Laravel application. We’ll follow the same pattern as before, this time naming the service web and it’s accompanying file web.dockerfile
Notes:
- We use
volumes_fromhere to re-use what we defined in the PHP-FPM service above. This means that this nginx container will inherit the/var/wwwdirectory (which is in turn mounted to our development machine) - we map port
8080on the host to80in the container. This is so that we can access0.0.0.0:8080whilst in development and won’t need to mess around with host names.
Next, we’ll create the web.dockerfile mentioned above:
Notes:
- As you can see, it’s just the standard nginx official image, with the
vhost.conffile from our local directory (created next) added to configure the server.
And here’s that file vhost.conf
vhost.confNotes:
- Notice how on line 12 we hand off php requests to
app:9000— this works because docker-compose will automatically link our services in a way that allows them totalkto each other via these simple hostnames. - The rest is just very basic nginx config — it’s not tuned in any way for performance or security— we’ll handle those in another post!
MYSQL
Next, we’ll configure the database, but we need to handle this one slightly differently to the previous services. With PHP-FPM & Nginx, we want files from our local directory to be accessible inside containers, to help speed up the development process. But this is not the case with a database — instead we want files created in the container to persist, allowing us to stop & restart services without losing data. This can also be achieved with a volume, only this time there’s no need for it to be synchronised with our host files.
Notes:
- On line 16 we create a named volume,
dbdata(the trailing:is deliberate, a limitation of yaml that you don’t need to worry about) - Then, on line 7 we reference that volume by using the format
<name>:<dir>So this is saying “mount the directory /var/lib/mysql from the volume named dbdata” - We set the required environment variables on lines 9, 10, 11 & 12 as required by the MySql docker image.
- We used
homesteadas the database/user name &secretas the password as these values match what can be found in the default.envthat ships with Laravel, meaning we won’t have to change it there. - Finally on line 13 we create an addition port mapping of
33061on the host to the regular3306inside the container. This is done solely to allow external tools easier access to the database whilst in development — it will not be needed in the production setup.
All services together
Let’s look at the final docker-compose.yml now to see how these pieces fit together.
Starting the services
If you’re following along, we’re almost there! But before we boot up the environment, we need to ensure 1) you ran composer install as instructed earlier in the post & 2) you have created the following files in the root of the project (all detailed above).
- docker-compose.yml
- app.dockerfile
- web.dockerfile
- vhost.conf
Here’s a gist showing all the files together, for your reference/copy&paste needs.
Once you have all of those in place, you can go ahead and execute the following command which will start all 3 services.
docker-compose up
Notes:
- The very first time you run this, it’s going to take minutes to start as it will need to download the images for all 3 services. Subsequent start times will be in the region of a second or 2, so don’t be put off by that initial download time.
Final steps, prepare the Laravel Application.
The last steps involve a couple of things that would’ve occurred automatically had we been using the official installer.
Environment configuration file
We first need to copy the .env.example file into our own .env file. This file will not be checked into version control & we’ll have separate ones for development & production. For now, just copy .env.example -> .env
Application key & optimize
Next we’ll need to set the application key & run the optimize command. Both of these are handled by artisan, but because we have PHP and the entire Laravel app running inside of a container, we can’t just run php artisan key:generate on our local machine like you normally would— we need to be issuing these commands directly into the container instead.
Luckily docker-compose has a really nice abstraction for handling this, the two commands needed would look like:
docker-compose exec app php artisan key:generate
docker-compose exec app php artisan optimize
In plain english, the first line is saying:
Execute the command ‘php artisan key:generate’ inside the container used by the service ‘app’
And just to make it crystal clear, here’s a visual showing how those commands break down:
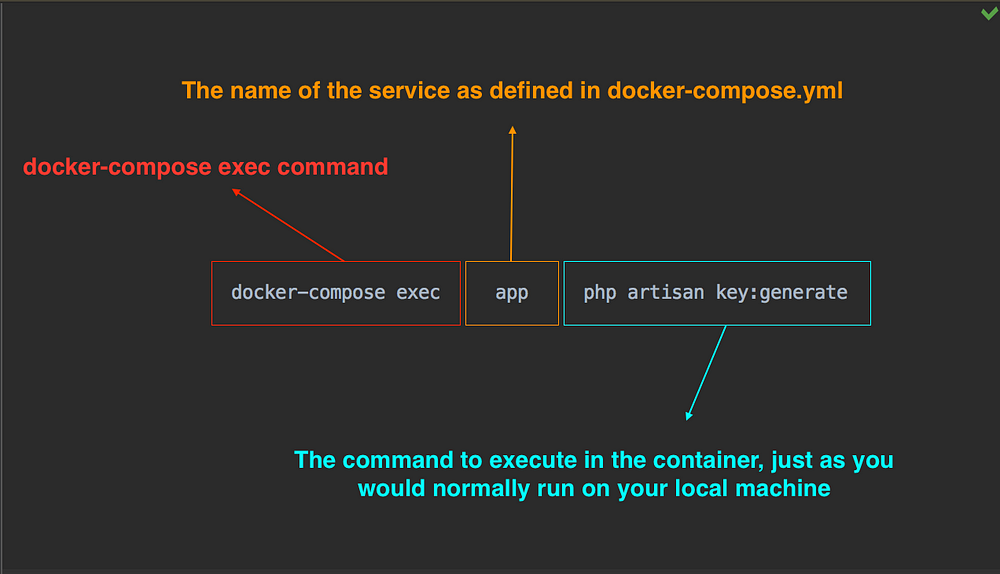
You’ll need this pattern any time you want to use artisan — remember the whole point of using docker is to avoid having the headaches of installing PHP versions on your local machine & this is how we get around it — by sending commands into containers, rather that running them directly.
Some other commands you’ll be running often in a Laravel project:
docker-compose exec app php artisan migrate --seed
docker-compose exec app php artisan make:controller MyController
I think you get the point by now.
Tip: create an alias like
phpdthat removes the need to type the full command, eg:phpd artisan migrate --seed
Once you’ve executed the two command mentioned before (artisan key:generate & artisan optimize) the application will now be ready to use — go ahead and hit http://0.0.0.0:8080 in your browser and you’ll presented with this lovely screen.
Reference from medium.com